

Nutmeg, the Wonder Dog, Sniffing
Have you seen the SSIS File Watcher demos where a developer puts an SSIS package in an infinite loop while it waits for a file to show up in a directory? It’s a popular pattern, especially when files are FTP’d (or SFTP’d) to enterprises for processing.
I’ve seen way too many memory leaks to feel comfortable with an SSIS package running forever. If you really, really need to start loading the contents of a file within milliseconds of its arrival, please write a service. That’s what services are for.
The Sniffer
But what if all you really know is SSIS? Maybe you don’t know how to write a service; maybe you don’t have time to learn. That’s ok. You can use a pattern I call the Sniffer Design Pattern.
I can hear you thinking, “What does a sniffer do, Andy?” I’m glad you asked! The sniffer executes every now and then, checks for some condition – like the presence of a file in a directory – logs what it finds, and then responds accordingly.
Sniffer Demo
Let’s build a Sniffer!
A File
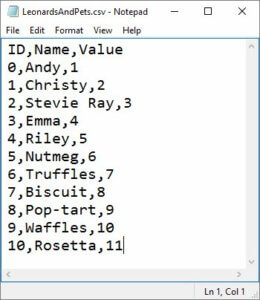
Begin by creating a file that contains some data. I created LeonardsAndPets.csv, shown above. Three columns: ID, Name, and Value. I’ve placed my file in a staging directory:

When it’s time to test, I will copy the file from the staging directory and paste it into the data directory.
An SSIS Package
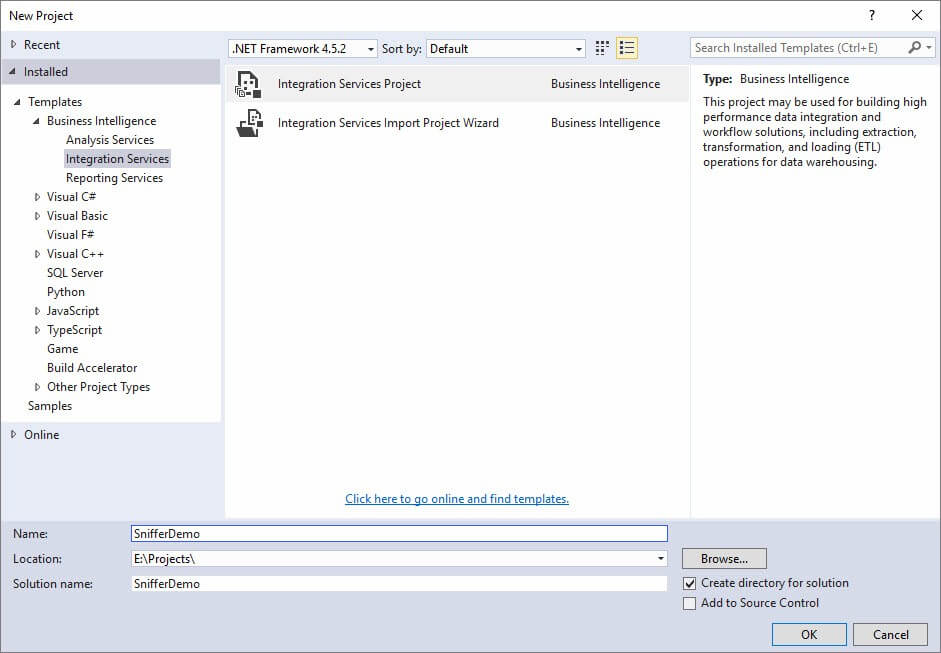
Create an SSIS Project named SnifferDemo:
Rename the default SSIS Package SnifferPackage.dtsx:

Add a parameter called SourceFolder:

We will use the SourceFolder parameter to set our directory to “watch” for a file. Now there are a couple ways to proceed. One is more “SSIS-y,” the other is more “script-y.” I’m going to show you the “SSIS-y” way. Please realize you can accomplish the same thing using an SSIS Script Task and a little .Net code.
In fact, you could do everything I’m showing you in this demo using a single Script Task.
Drag a Foreach Loop Container from the SSIS Toolbox onto the Control Flow surface. Rename the Foreach Loop Container “FOREACH File in SourceFolder”:

Double-click the Foreach Loop Container to open the editor. Navigate to the Collection page. Just beneath the Enumerator property dropdown, please find the Expressions property and click the ellipsis for Expressions shown circled in the image below:

This opens the Property Expressions Editor window. These expressions, by the way, are Enumerator-specific. Select the Directory Property from the Property dropdown and click the ellipsis in the Expression textbox to open the Expression Builder window:

Expand Variables and Parameters. Click $Package::SourceFolder and drag it to the Expression textbox. Click the Evaluate Expression button to see the default for this parameter in the Evaluated value textbox.
Click OK a couple times to return to the Foreach Loop Container Editor. Change the Files specification to “*.csv” and make sure the Retrieve File Name “Fully qualified” option is selected:

Navigate to the Variable Mappings page and click “<New Variable…>” from the Variable dropdown:

When the Add Variable dialog displays, make sure the Container is set to the Package level. Change the Name of the Variable to FileName, accept the defaults for all other properties and click the OK button:

Click the OK button to close the Foreach Loop Container editor.
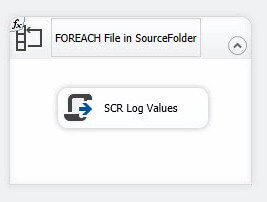
Drag a Script Task from the SSIS Toolbox into the Foreach Loop Container named FOREACH File in SourceFolder. Rename the Script Task “SCR Log Values”:
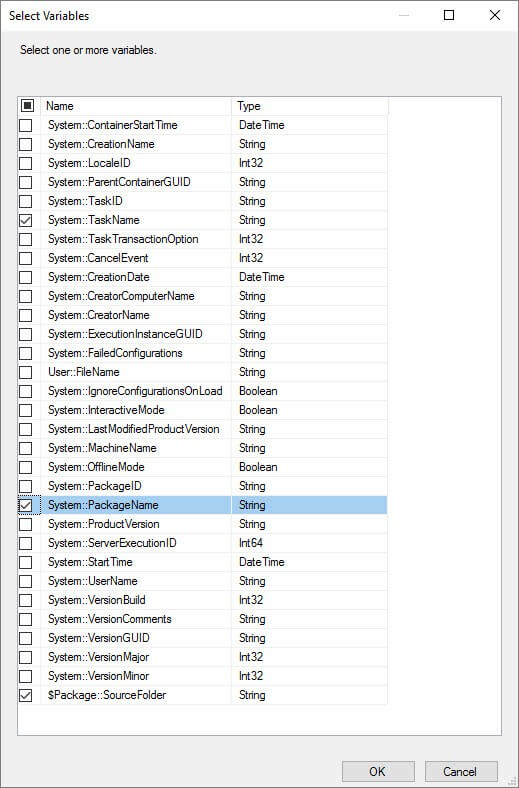
Double-click the Script Task to open the Script Task Editor. Leave the Script Language set to Microsoft Visual C#. Click the ellipsis in the ReadOnlyVariables property textbox to open the Select Variables dialog:

Click the OK button. Click the Edit Script button. Find the public void Main() method and edit it so it contains the following code:
public void Main()
 {
 string sourceFolder = Dts.Variables["$Package::SourceFolder"].Value.ToString();
 string fileName = Dts.Variables["User::FileName"].Value.ToString();
 bool fireAgain = true;

string msg = "Source Folder: " + sourceFolder;
 Dts.Events.FireInformation(1001, "SCR Log Values", msg, "", 0, ref fireAgain);

msg = "File Name: " + fileName;
 Dts.Events.FireInformation(1001, "SCR Log Values", msg, "", 0, ref fireAgain);

Dts.TaskResult = (int)ScriptResults.Success;
 }
Close the script editor and click the OK button to close the Script Task Editor.
Unit Test
We have enough functionality built to run a small unit test, so let’s do so. Click the Play button or press the F5 key to start the package. Click the Progress tab and view the messages:

Successful test! No messages from our Script Task because there are no files found. But this brings up an issue in our design. If there are no files found, wouldn’t we like to know where the package looked for a file? I know I would.
Let’s stop the debugger and return to the Control Flow. Copy the “SCR Log Values” Script Task to the clipboard:

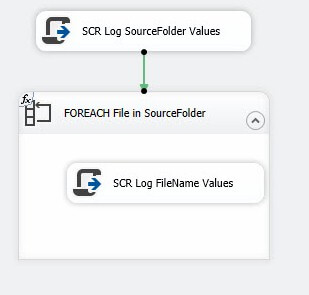
Paste the copied Script Task outside of the Foreach Loop Container. Once pasted, rename the new Script Task “SCR Log SourceFolder Values” and connect a precedence constraint (green arrow) from the new Script Task to the Foreach Loop Container. Finally, rename the Script Task inside the Foreach Loop Container to “SCR Log FileName Values”:
Open the Script Task editor for “SCR Log SourceFolder Values.” Click the ellipsis for ReadOnlyVariables and deselect User::FileName. Select System::PackageName and System::TaskName:
Click the OK button to close the Select Variables window. Click Edit Script to open the VSTA Editor. Modify public sub Main() as shown:
public void Main()
 {
 string sourceFolder = Dts.Variables["$Package::SourceFolder"].Value.ToString();
 string packageName = Dts.Variables["System::PackageName"].Value.ToString();
 string taskName = Dts.Variables["System::TaskName"].Value.ToString();
 string subComponent = packageName + "." + taskName;
 bool fireAgain = true;

string msg = "Source Folder: " + sourceFolder;
 Dts.Events.FireInformation(1001, subComponent, msg, "", 0, ref fireAgain);

Dts.TaskResult = (int)ScriptResults.Success;
 }
In this C#, we add three string variables – packageName, taskName, and subComponent – and delete the fileName variable and it’s related code. Why? I like instrumentation. Especially ETL instrumentation. The packageName, taskName, and subComponent variables provide more information about where the information message is originating. We remove fileName because it’s empty at this stage of package execution. Close the the VSTA Editor and the Script Task Editor.
Open the Script Task editor for “SCR Log FileName Values.” Click the ellipsis for ReadOnlyVariables and deselect $Package::SourceFolder. Select System::PackageName and System::TaskName as before. Click the OK button to close the Select Variables window. Click Edit Script to open the VSTA Editor. Modify public sub Main() as shown:
public void Main()
 {
 string packageName = Dts.Variables["System::PackageName"].Value.ToString();
 string taskName = Dts.Variables["System::TaskName"].Value.ToString();
 string subComponent = packageName + "." + taskName;
 string fileName = Dts.Variables["User::FileName"].Value.ToString();
 bool fireAgain = true;

string msg = "File Name: " + fileName;
 Dts.Events.FireInformation(1001, subComponent, msg, "", 0, ref fireAgain);

Dts.TaskResult = (int)ScriptResults.Success;
 }
Again, we’re adding the instrumentation pieces and removing the sourceFolder parts. Close the the VSTA Editor and the Script Task Editor.
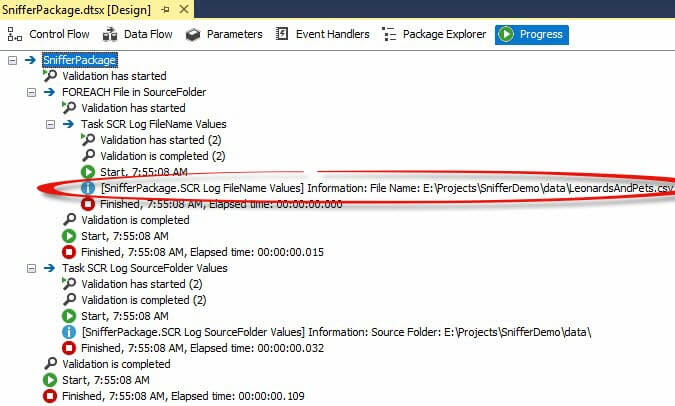
It’s now time for test number 2. Press the F5 key or click the Play button to start the package. Click on the Progress tab to view messages. You should see a message similar to that circled below:

Now we know where the Sniffer… sniffed.
Before proceeding with test number 3, Open Windows Explorer and navigate to the SourceFolder you specified as a default for the $Package::SourceFolder parameter. If you took my earlier advice, you have a file sitting in the staging directory:
If you didn’t take my advice, take it now!
Next, copy the file into the SourceFolder directory:

Now re-execute the SSIS package and check the Progress tab. If all goes as planned, we should see another information message indicating the Foreach Loop Container found a CSV file right where we told it to look:
You may be thinking, “Is this really the way you develop SSIS packages, Andy?” That’s a fair question and the answer is “Yep.” I get the instrumentation working first because I often use the same variables later, like we will later in this demo.
Adding the Data Flow
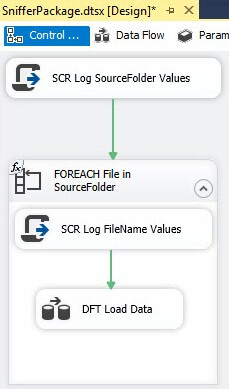
Drag a Data Flow Task into the Foreach Loop Container and rename it “DFT Load Data.” Connect a precedence constraint from the SCR Log FileName Values to the data flow:
Double-click the data flow to open the editor (tab). Drag a Flat File Source adapter onto the Data Flow canvas and rename it “FFSrc Flat File.” Double-click the Flat File Source adapter to open the editor:
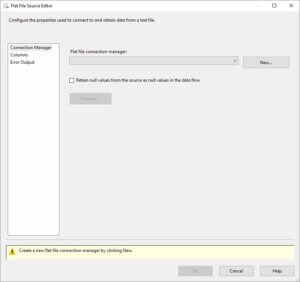
Click the New button beside the Flat File Connection Manager dropdown. Clicking the New button does a couple things:
- Creates a new Flat File Connection Manager (shown in the red box below); and
- Opens the Flat File Connection Manager Editor.
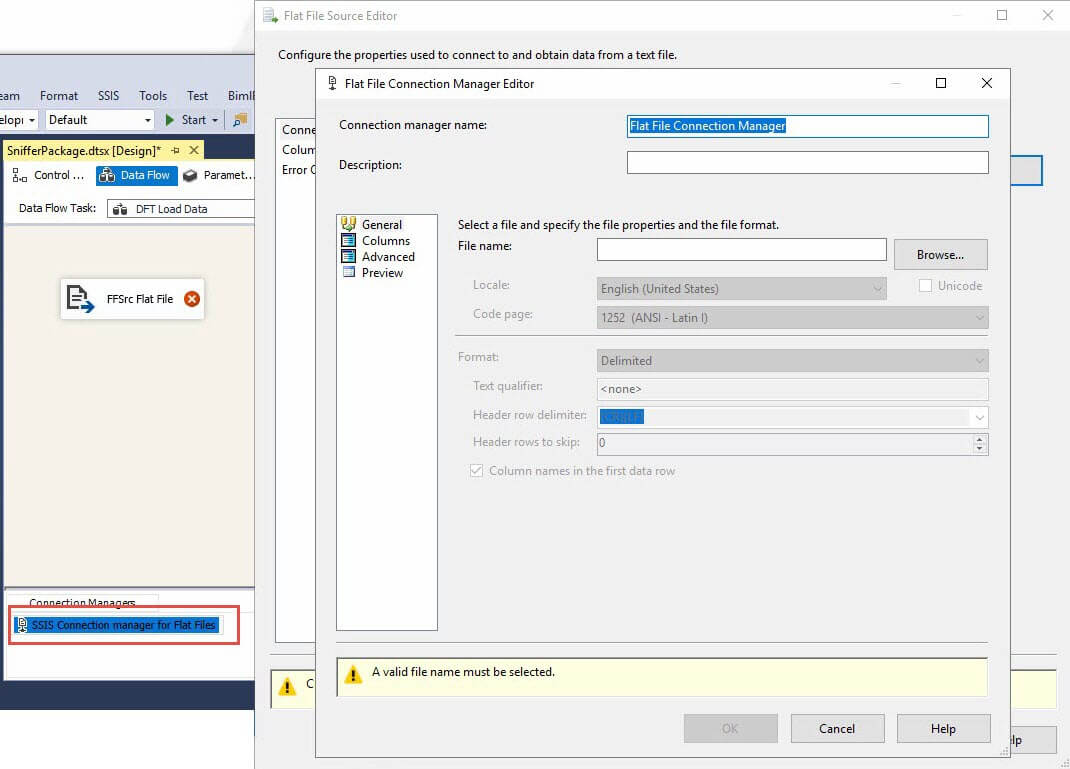
Name the Flat File Connection Manager “FFCM Flat File” and set the File Name property to the location of your flat file in the SourceFolder:

Click on the Columns page to view the Columns in the file:
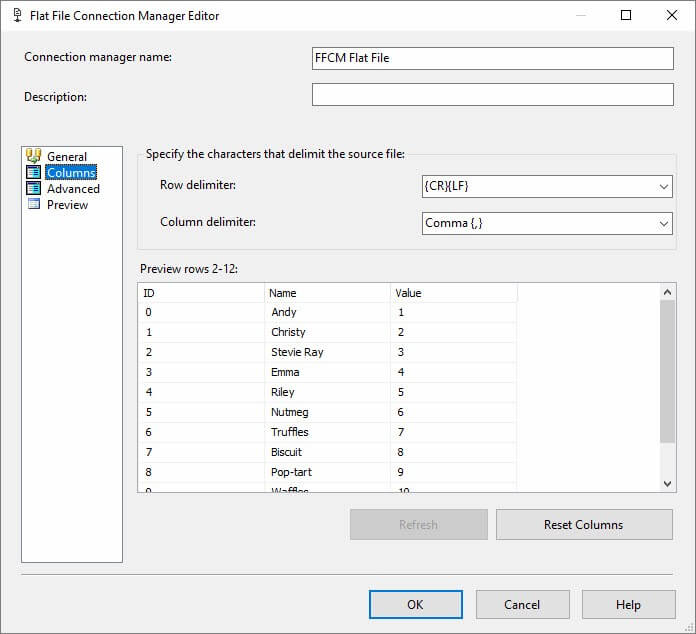
Click the OK button to close the Flat File Connection Manager Editor.
Click the OK button to close the Flat File Source Editor.
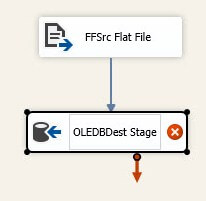
Drag an OLE DB Destination adapter onto the Data Flow canvas. Connect a data flow path (blue arrow) from the Flat File Source adapter to the OLEDB Destination adapter and rename it “OLEDBDest Stage”:
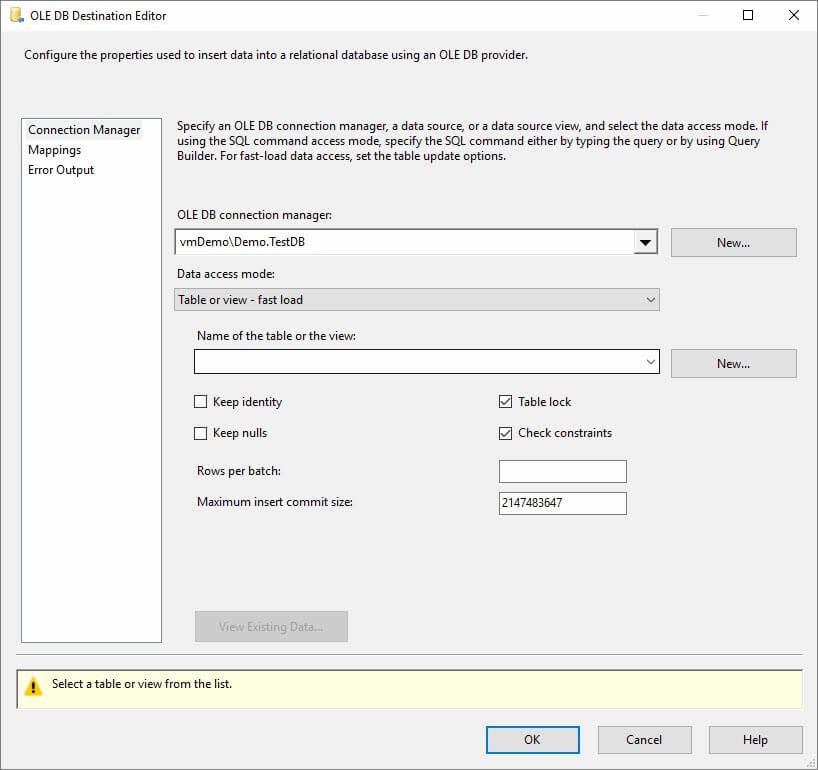
Double-click the OLE DB Destination adapter to open the OLE DB Destination Editor. Similar to the Flat File Source adapter, click the New button beside the OLE DB Connection Manager dropdown to 1) create a new OLE DB Connection Manager; 2) open the Configure OLE DB Connection Manager window:

If you haven’t configured any OLE DB connection managers to date on this system, your Configure OLE DB Connection Manager window will appear empty, as shown above. Click the New button to configure an OLE DB Connection Manager:
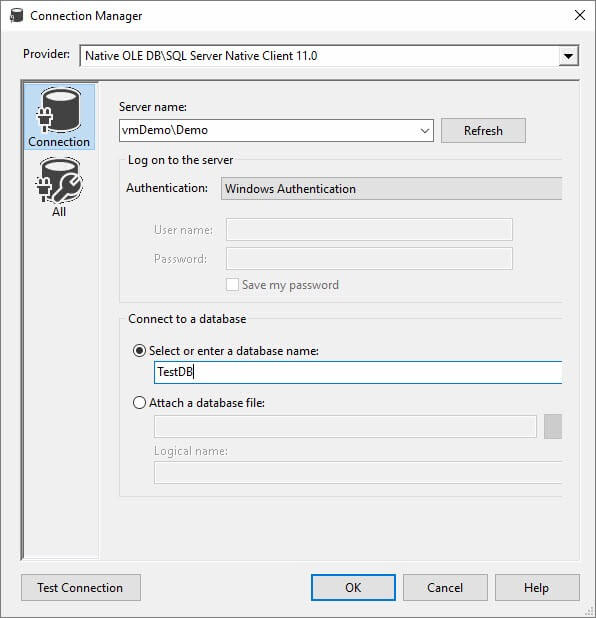
Enter your SQL Server target instance and database name. Click the OK button to close the Connection Manager editor. Click the OK button to close the Configure OLE DB Connection Manager window.
For staging tables, I like to set the Data Access Mode property to “Table or view – fast load” and accept the configuration defaults:
One fast trick to creating a staging table is to click the New button beside the “Name of the table or view” dropdown. This opens the Create Table dialog, pre-populated with a CREATE TABLE statement built using the metadata in the data flow path connecting the Flat File Source adapter to the OLE DB Destination adapter. It’s almost magic:

You may want to rename the table before you create it. Click the OK button to create the table because the default table name is the name of the OLE DB Destination adapter.
The OLE DB Destination is almost configured. Note the warning message at the bottom of the editor, “Map the columns on the Mappings page.”:

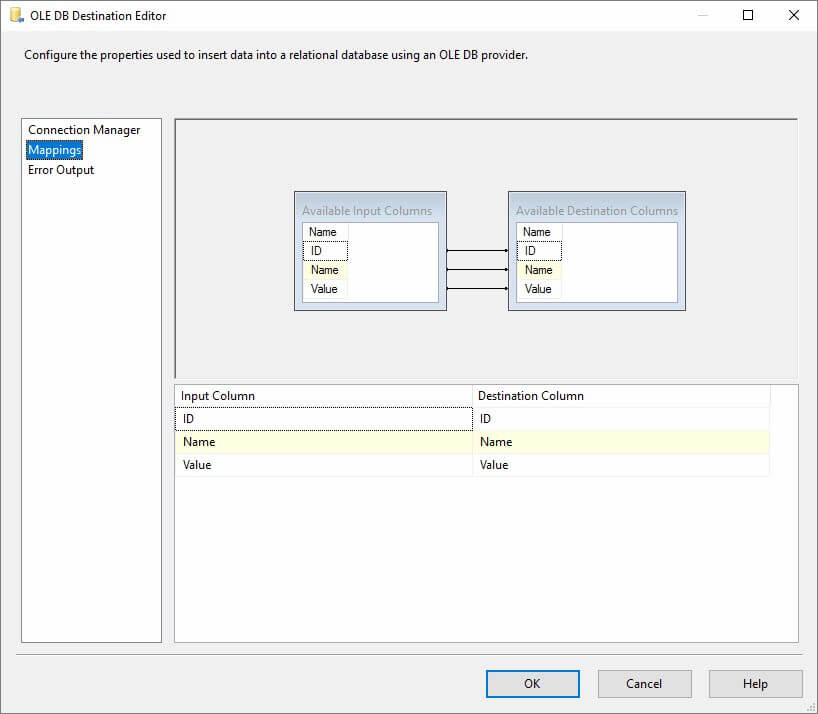
Click the Mappings page. The Available Input Columns should be auto-mapped to the Available Destination Columns because the Available Input and Available Destination columns have the same names and data types. Why do they have the same names and data types? The destination table was built from metadata based on the flat file:
Make it Dynamic
This will actually run and load our data from our file into the table we created. But it’s not taking advantage of the Foreach Loop Container finding the file we want to load, and that’s really the whole point, isn’t it? When a file shows up, load it!
Let’s fix that now.
Right-click the FFCM Flat File Connection Manager and click Properties. When the Properties grid displays, click the ellipsis in the Value (or Setting) textbox of the Expressions property:

When the Property Expressions Editor opens, select the ConnectionString property from the Property dropdown. Then click the ellipsis in the Expression textbox for the ConnectionString property:

The Expression Builder dialog opens. Expand Variables and Parameters and drag User::FileName to the Expression textbox:
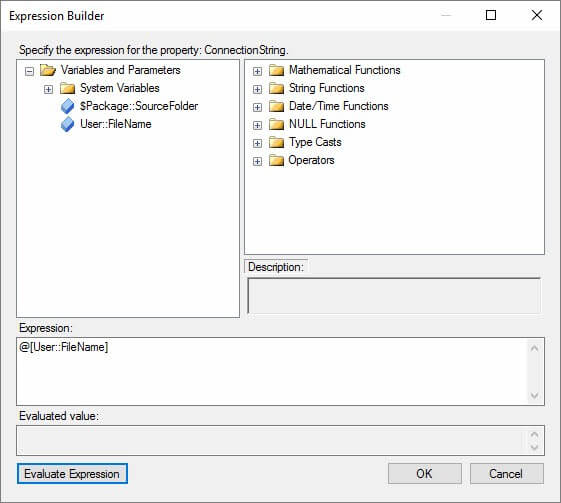
Click the OK button to close the Expression Builder dialog.
Click the OK button to close the Property Expressions Editor.
Because the Connection String of the Flat File Connection Manager is dynamic, we need to configure it to respond “well” to no file in the folder. Connection Managers can be picky when it comes to things like missing connection strings. And some validation errors can cause the entire package to fail before it really gets a chance to run.
To manage this use case, set the DelayValidation property on the FFCM Flat connection manager to True:

Test!
You guessed it. It’s time for another unit test!
Press the F5 key or click the Play button to run the SSIS package. If all goes as planned, we should see the following results:

One Last Thing
Before we wrap this up and call it a success, let’s archive the file after we load it.
Drag a File System Task onto the Control Flow canvas and rename is “FIL Archive File”:

Click the Parameters tab and add a new String parameter named ArchiveFolder. Set the Value property to a folder where you wish to archive the file once it has been loaded:

Return to the Control Flow and double-click the File System Task to open the editor. Set the IsDestinationPathVariable to True. Set the DestinationVariable property to $Package::ArchiveFolder. Set the OverwriteDestination property to True. Select “Move file” as the Operation:

Set the IsSourcePathVariable to True. Select the User::FileName variable from the SourceVariable dropdown:

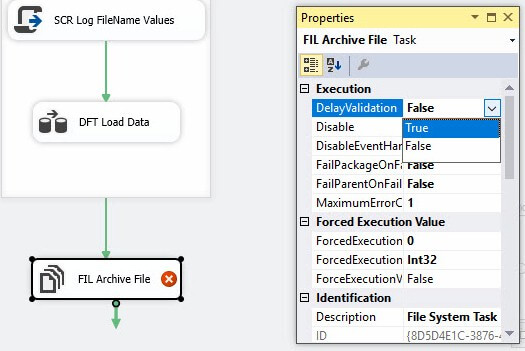
Click the OK button to close the File System Task editor. But wait – what’s up with the red circle and white X?

The error reads, “Validation error. FIL Archive File File System Task: Variable “FileName” is used as a source or destination and is empty.” Remember those pesky validation errors I mentioned earlier? This is another one. The solution is the same: Set the DelayValidation property to True for the File System Task:
Boom! Happy File System Task:

But will it work? There’s only one to find out… you guessed it, another test!
Press the F5 key or click the Play button to start the SSIS package in the debugger. Position Windows Explorer so you can watch the file in the Source Folder directory. When the package succeeds, the file is moved:

Where’s our file? It’s in the ArchiveFolder!

Conclusion
As you can see, the Sniffer design pattern is not trivial, but it works well. In my opinion, it’s better than locking an SSIS package into an infinite (or even long-running) loop.
Get the Code
Want to play around with the code for this demo? You can! Grab the code at GitHub.
Need Some SSIS Help?
:{>
Thanks for all your hard work – good info!
I have a couple questions:
1) how do I set the package up to run and process a file, and then automatically start listening for the next time the file arrives without my intervention?
2) I have 40+ files I have to watch for, each are different and get loaded into different tables/DBs. Do I have to do this process for each file?
Hi Shairal,
Regarding your questions:
1. I archive the file after the load succeeds. If the load process fails, I archive the file in a different folder. The key here is: move the file out of the directory. If you are checking for a file every minute and the process loading the file into the directory take more than a minute, you will want to include some logic to make sure the file is not in use.
2. You can load multiple files using the same SSIS Data Flow Task if and only if the schema of the files is identical and the data is loaded to the same destination table. I’ve seen this applied in scenarios where an enterprise is made up of several divisions (or other companies) and the same data needs to be collected from each division/company; or where the same data needs to be loaded into every tenant database of a multi-tenant, single-database-per-tenant solution.
If the schema is different for each file, then you have to use different Data Flow Tasks to load that data. In my opinion, SSIS packages should be designed as small, unit-of-work, function-ish packages. I would build one package for each file loader.
Thank you for your kind words.
Hope this helps,
:{>
This was great! Thank you so much for the wonderful tutorial.
Hi MonishBista,
Thank you for reading my blog and for your kind words.
:{>
Very good article. Thank you, Andy.
I have the same question as Shairal did and could not find the answer from your article.
1) how do I set the package up to run and process a file, and then automatically start listening for the next time the file arrives without my intervention?
Un trabajo completo, para darte un buen panorama de un ETL. Saludos
Hi Andy, This looks like just what I need and while I use SSIS quite a lot, I am new to using a script task and editing the script. I have been following the process but then when I ran test #2, I received an error:
at System.RuntimeMethodHandle.InvokeMethod(Object target, Object[] arguments, Signature sig, Boolean constructor)
at System.Reflection.RuntimeMethodInfo.UnsafeInvokeInternal(Object obj, Object[] parameters, Object[] arguments)
at System.Reflection.RuntimeMethodInfo.Invoke(Object obj, BindingFlags invokeAttr, Binder binder, Object[] parameters, CultureInfo culture)
at System.RuntimeType.InvokeMember(String name, BindingFlags bindingFlags, Binder binder, Object target, Object[] providedArgs, ParameterModifier[] modifiers, CultureInfo culture, String[] namedParams)
at Microsoft.SqlServer.Dts.Tasks.ScriptTask.VSTATaskScriptingEngine.ExecuteScript()
Do you have a suggestion for what I might have done wrong? Thanks
Great tutorial, exactly what I needed to learn. However, I’m getting an error when I copy my file from the staging folder to the sniffer folder to run the actual test. Even though all the unit tests were successful.
The error:
Error: Exception has been thrown by the target of an invocation.
I have searched this blog for answers but am not finding anything.
https://andyleonard.blog/2019/05/ssis-script-task-error/
Thanks for the detailed instructions, it runs like clockwork. Best regards, Alex
Thank you Andy excellent stuff as always. One change I made, I moved the Archive File Control Flow Item into to For Each Loop to process multiple .csv files. Isn’t this the reason for a For Each Loop File Enumerator? Works like a charm. Best Regards, Chris Becker bcsdata.net
Great tutorial, and really helpful to see the path you took to create it.
For anyone hitting errors for test two, make sure that you have added the System PackageName and Task Name as ReadOnly Variables. You need to do this for both the SCR Log SourceFolder Values task, and the Log FileName one. It’s easy to get caught up in the excitement of things working, and accidentally skip steps.
Hi Andy,
Thank you for all your help!
My question is with respect to having the package “sniff/execute every now and then” :
– In order to look for a file, (let’s say every 30 minutes for 3 hours i.e.6 times in total),do I need to schedule the package to run ( 6 times d) via a SQL job?
Thanks
Shashank
Hi Shashank,
Thanks for reading my blog and for your question.
SQL Agent job schedules support triggering a job every 30 minutes for 3 hours. You might consider adding logic to prevent multiple loads (or load attempts) of the same data. You could add an SSIS Execute SQL Task to the loader SSIS package called by the sniffer to disable the trigger after the load. After the three hour window has passed, but before it has started the next day, you would want to add a different SQL Agent job to re-enable the disabled schedule.
Just a thought,
Andy