Visit the landing page for the Data Engineering Execution Orchestration Frameworks in Fabric Data Factory Series to learn more.
In an earlier post in this series – a post titled Fabric Data Factory Design Pattern – Basic Parent-Child – I demonstrated one way to build a basic parent-child design pattern in Fabric Data Factory by calling one pipeline (child) from another pipeline (parent). In the next post, titled Fabric Data Factory Design Pattern – Parent-Child with Parameters, I modified the parent and child pipelines to demonstrate passing a parameter value from a parent pipeline when calling a child pipeline that contains a parameter. In the next post, titled Fabric Data Factory Design Pattern – Dynamically Start a Child Pipeline, I modified the original parent pipeline, adding a pipeline variable to dynamically call the child pipeline using the child pipeline’s pipelineId value. In the previous post, titled Fabric Data Factory Design Pattern – Dynamically Start a Collection of Child Pipelines, I stored an array of child pipeline Id values in a pipeline variable and executed each child pipeline represented by the pipelineId values contained in the array.
In this post, I clone and modify the dynamic parent pipeline from the previous post to retrieve metadata from an Azure SQL database table for several child pipelines, and then call each child pipeline from a parent pipeline.
When we’re done, this pipeline will:
- Read pipeline metadata from a table in an Azure SQL database
- Store some of the metadata (a collection of pipelineID values) in the (existing) pipelineIdArray variable
- Iterate the pipelineIdArray variable’s collection of pipelineID values
- Execute each child pipeline represented by each pipelineID value stored in the pipelineIdArray variable
In this post, we will:
- Create and populate a database table to contain Fabric Data Factory pipeline metadata
- Clone and edit the dynamic parent pipeline from the previous post
- First, get the metadata
- Next, set the pipelineIdArray variable value
- Finally, edit the ForEach iterator
- Test
Create and Populate a Database Table to Contain Fabric Data Factory Pipeline Metadata
I use the following script to:
- Create a schema named “fdf” (for Fabric Data Factory)
- Create a table named “fdf.pipelines”
- Populate the fdf.pipelines table with Fabric Data Factory pipelines metadata
The script above first creates a schema named fdf, then a table named fdf.pipelines, and finally populates the table with Fabric Data Factory pipelines metadata – the same metadata we used in the previous post in this series. The script is idempotent, which means you can re-execute it and achieve the same outcome. the test-for-metadata condition in the if statement is weak. In real life, I’d wrap each INSERT inside a row-specific if statement… but this script is long enough as it is.
The first time the script is executed (in SQL Server Management Studio, or SSMS), the following results are displayed:

Subsequent executions result in the following Messages:
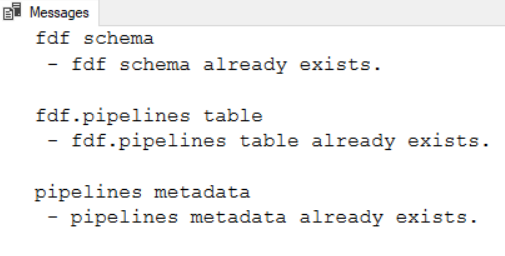
There’s a SELECT statement commented-out at the bottom of the script. Executing this statement displays the contents of the fdf.pipelines table:

Clone and Edit the Dynamic Parent Pipeline from the Previous Post
The dynamic parent pipeline from the previous post was named “invoke-child-pipeline-dynamic-multiple”. The parent pipeline executed a collection of child pipelines from an array of pipelineId values stored in a pipeline variable named “pipelineIdArray”.
To begin building this demo:
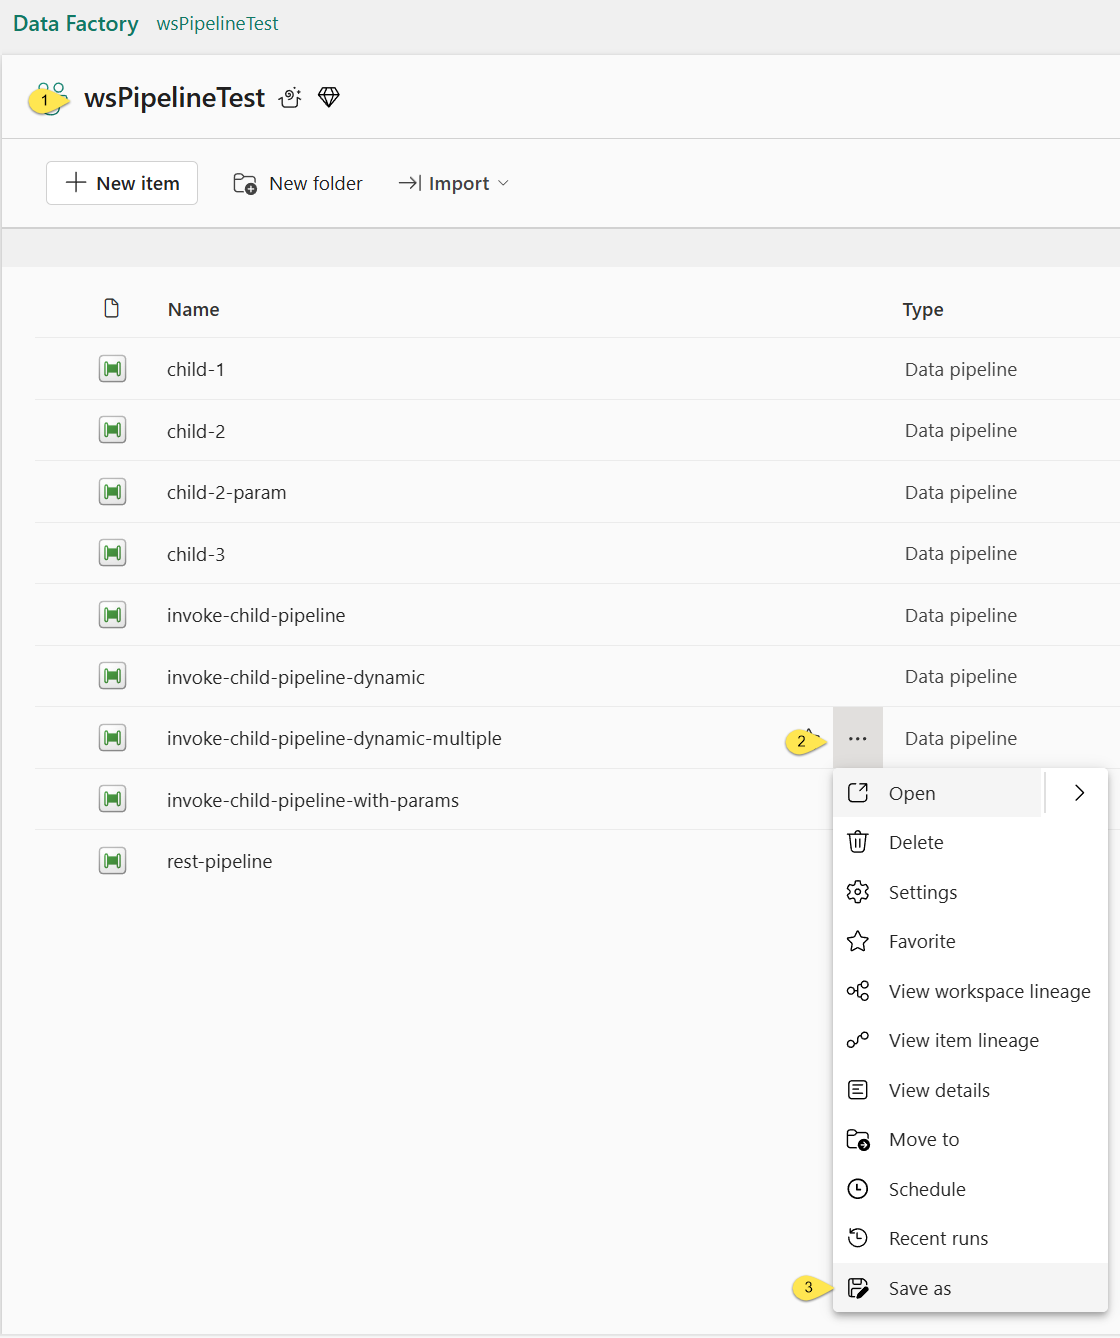
- Visit the workspace you’ve been using for demo purposes in this series (mine is named “wsPipelineTest”)
- Click the ellipsis beside the pipeline named “invoke-child-pipeline-dynamic-multiple”
- Click “Save as”:
To complete the cloning process:
- Name the new parent pipeline “invoke-child-pipelines-from-metadata”
- Click the “Save” button:

First, Get the Metadata
There are at least a couple ways to surface metadata in a Fabric Data Factory. I choose to use the Script activity.
- Click the “Activities” tab
- Click the Script activity:
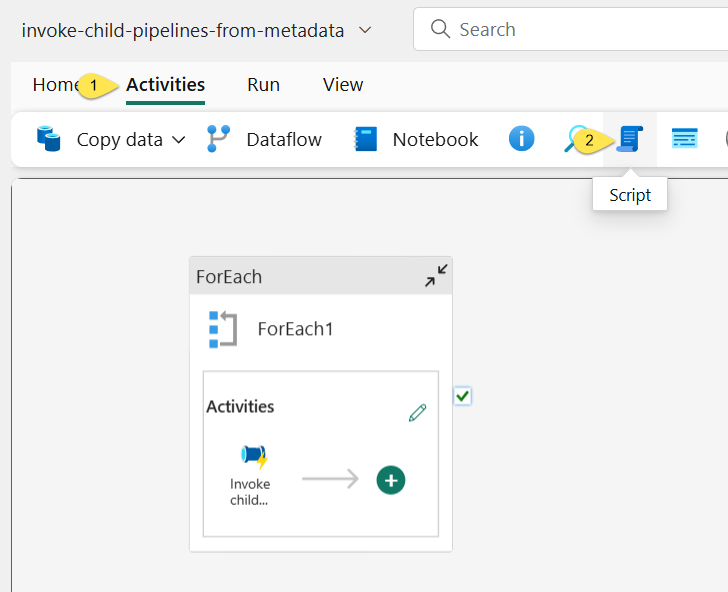
When the Script activity displays on the Fabric Data Factory surface,
- Connect an “On Success” output from the Script activity to the ForEach activity
- Select the Script activity and click on the “General” tab
- Set the Script activity’s “Name” property to “Get Pipelines Metadata”:

To continue configuring the Script activity,
- Click the “Settings” tab
- Click the dropdown for the “Connection” property
- Click “More” from the list of connections

When the “Choose a data source to get started” dialog displays, select “Azure SQL database”:

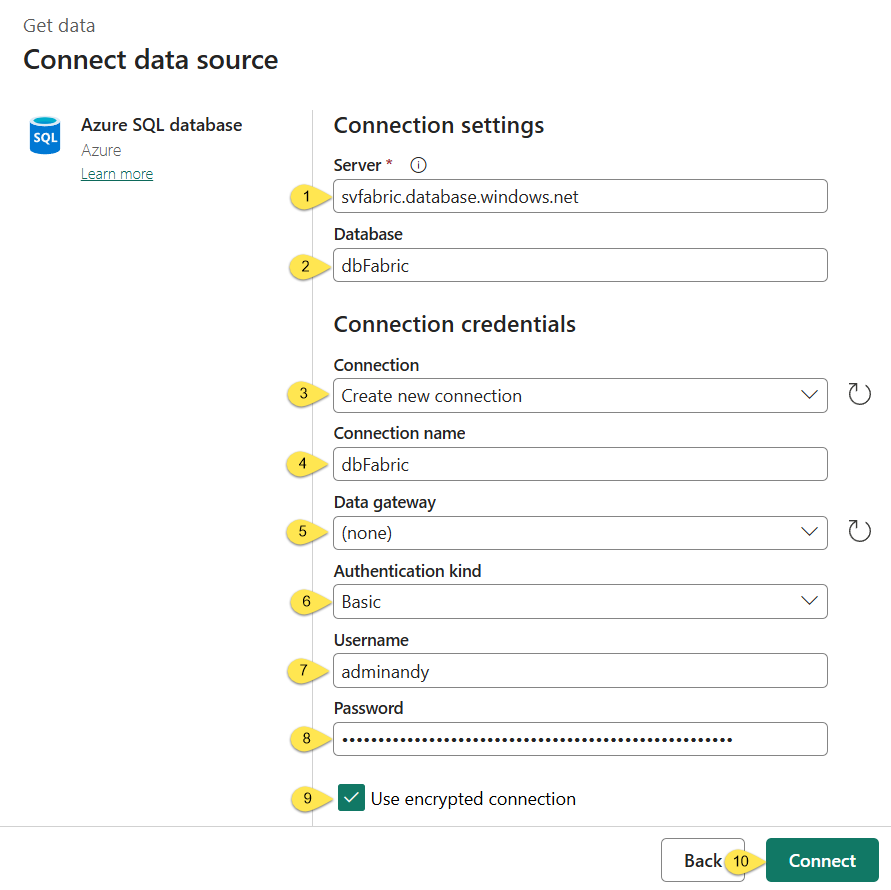
When the “Connect data source” dialog displays,
- Enter the Azure SQL server instance in the “Server” property
- Enter the database name in the “Name” property
- Set the “Connection” property to “Create new connection” (default, unless there is an existing connection for the same server and database)
- Enter a name for the connection in the “Connection name” property
- Make sure the “Data gateway” is set to “(none)” (default)
- Set the “Authentication kind” property to “Basic” if you are using basic authentication to connect to the Azure SQL database (default)
- If you are using basic authentication to connect to the Azure SQL database, enter your username in the “Username” property
- If you are using basic authentication to connect to the Azure SQL database, enter your password in the “Password” property
- Make sure the “Use encrypted connection” checkbox is checked (default)
- Click the “Connect” button:
When the “Connect” button is clicked, the Fabric Data Factory engine attempts to establish a connection with the Azure SQL database using the configuration supplied by the engineer. If the connection attempt fails, an error will be displayed near the top of the “Connect data source” dialog:
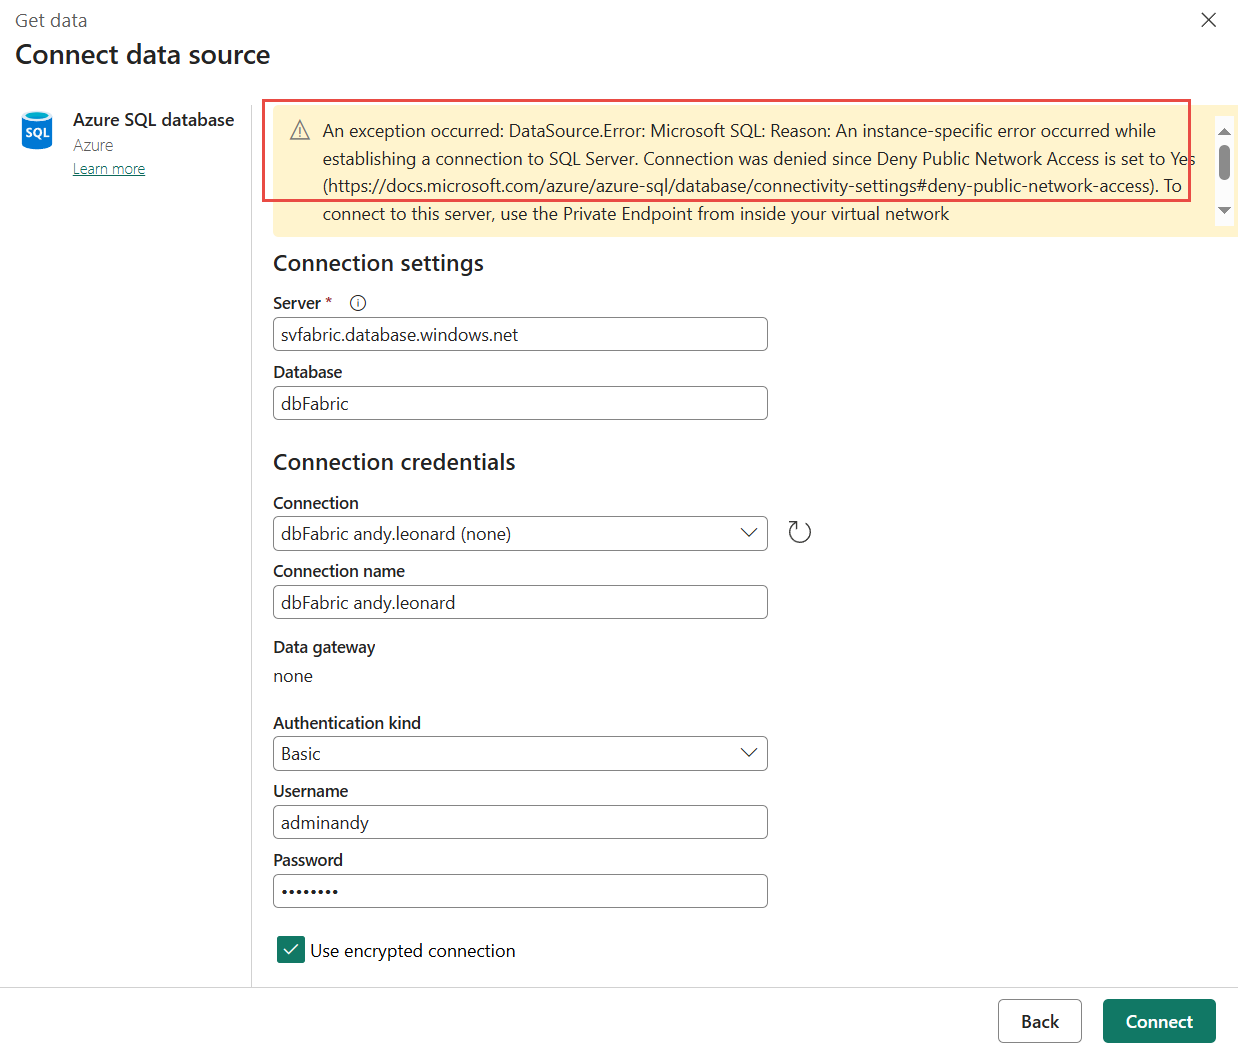
A common error is:
This error is caused by your Azure SQL DB server firewall configuration. To address Azure SQL DB firewall server firewall configuration issues, connect to the Azure Portal, connect to the SQL database page, and then click “Set server firewall”:

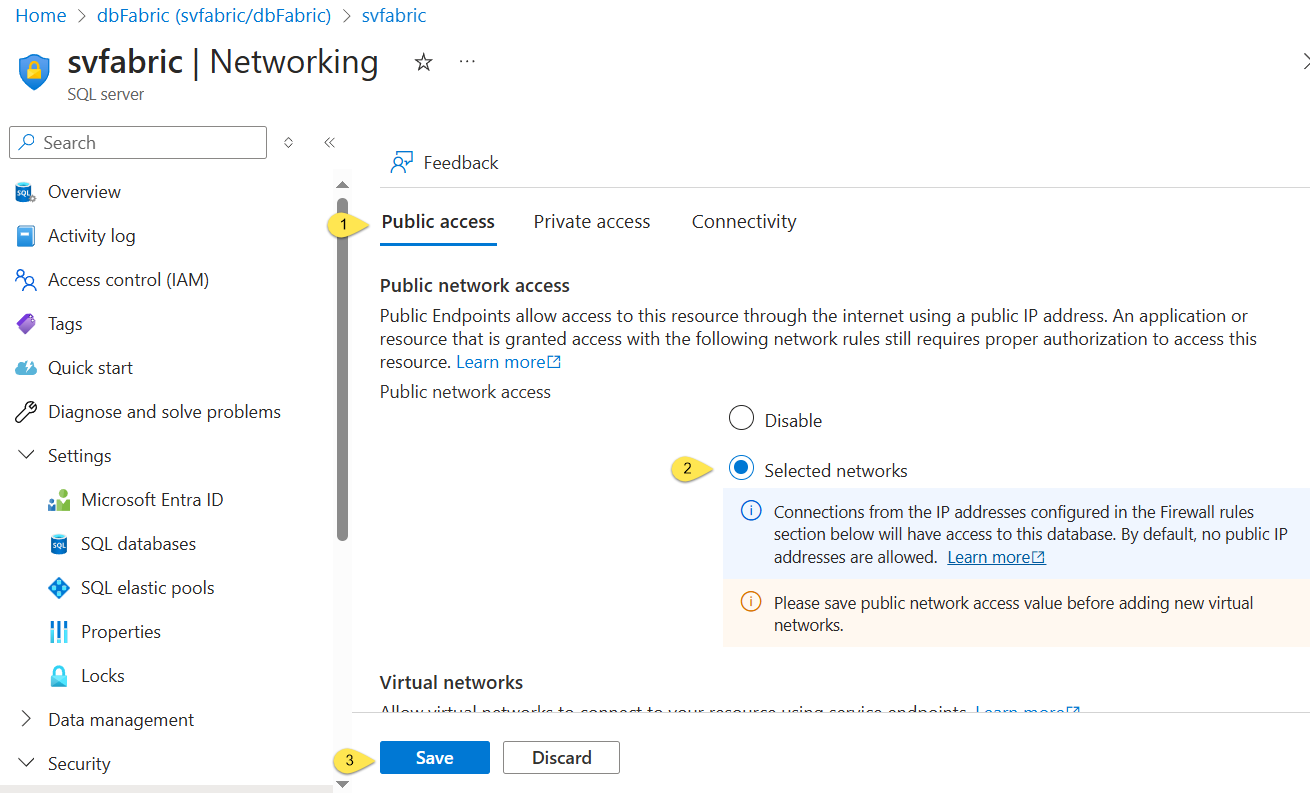
When the Networking blade displays,
- Make sure the “Public access” tab is selected (default)
- In the “Public network access” category, click “Selected networks”
- Click the “Save” button:
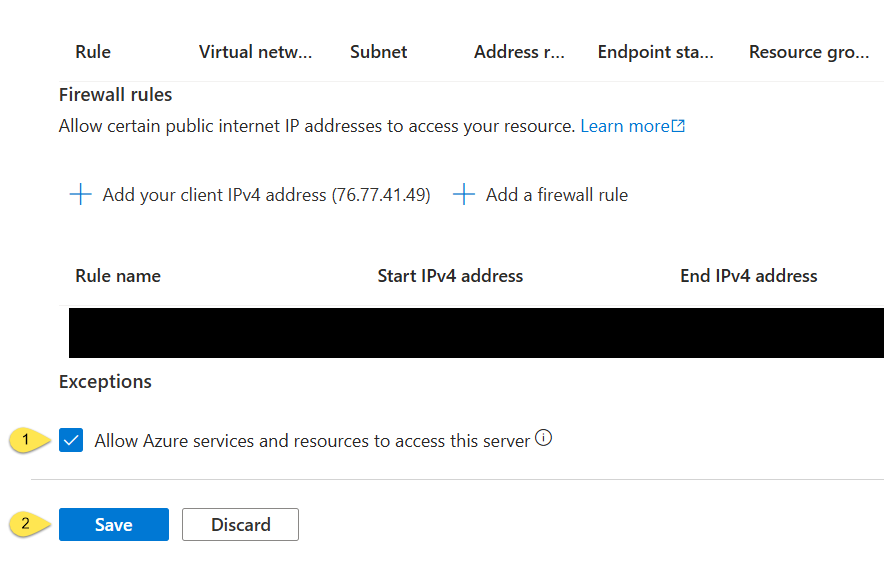
Usually, while I’m here, I configure a firewall rule to allow my IP to connect to the server (and database). I then
- Check the “Allow Azure services and resources to access this server” checkbox
- Click the “Save” button:
Return to Fabric Data Factory and the “Connect data source” dialog. Click the “Connect” button again. The “Connect data source” dialog should disappear – which indicates the connection attempt succeeded. If the “Connect data source” dialog displays additional error messages, address them so that you are able to connect to the database containing your Fabric Data Factory pipelines metadata table.
Once you successfully connect to your Fabric Data Factory pipelines metadata database,
- Make sure the “Database” property is configured to your database name (this property is set from the connection by default)
- Make sure the “Script” property (type) is set to “Query” (default)
- Enter the following T-SQL query in the “Script” property (query) textbox:

Peek at the Metadata JSON
Before proceeding, let’s deactivate the ForEach activity and conduct a test-execution:
- Select the ForEach activity
- Edit the “Activity state” property, set it to “Deactivated”:

Test-execute the pipeline:

When the test-execution completes,
- On the “Output” tab, click the “Output” icon on the “Get Pipelines Metadata” script activity
- When the “Output” displays, click the “Copy to clipboard” button:

Paste the JSON into a text editor. Here I use Notepad++ because I can configure the editor to treat the text as JSON:
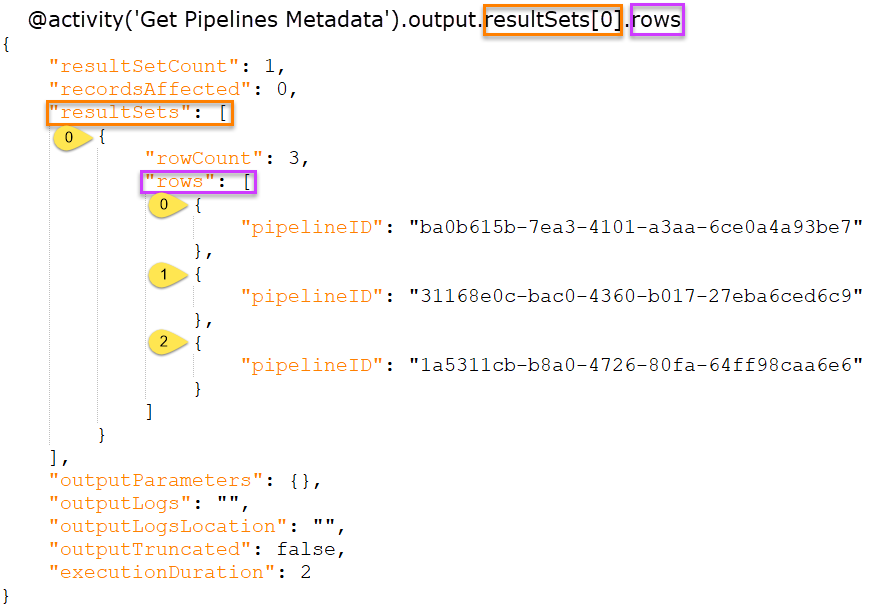
A JSON Aside
JSON is made up of keys and values, listed in JSON as
In the JSON listed in the image above, the first key is “resultSetCount” and the value is “1”.
The “resultSets” key value contains an collection of JSON keys and values.
JSON collections are denoted using square brackets.
The opening square bracket – “[” – that follows “resultSets”: contains more JSON key-value pairs. The “rows” key value is another array that represents an collection of “pipelineID” keys and values.
In the image above, I employ some color-coding to identify pieces of the Fabric Data Factory expression we will eventually configure. That expression is:
The first portion of the expression identifies the output of the source activity:
The second portion – inside the orange box – identifies the collection (or array) found at the top level of the JSON output:
resultSets is an array, as denoted by the opening square bracket – “[” – that follows “resultSets”, even though there is only a single resultSet –
– defined in the JSON.
contains two keys: “rowCount” and “rows” and the “rows” value is also an array (as denoted by the opening square bracket – “[” – that follows “rows”).
The “rows” array contains three “pipelineID” keys, and each key value is the value of a pipelineID we stored in (and that the “Get Pipeline Metadata” script activity read from) our metadata table named fdf.pipelines in the dbFabric database.
Activate the ForEach activity before proceeding.
Next, Set the pipelineIdArray Variable Value
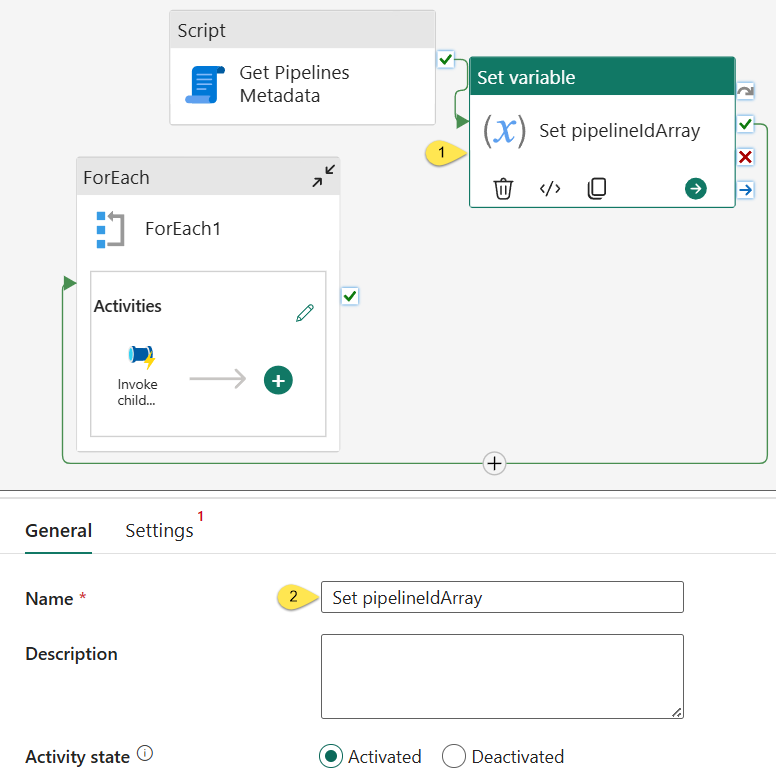
To inject a “Set variable” activity into the existing “On success” output between the Script activity and the ForEach activity,
- Hover over the “On success” output
- Click the “+” in a circle when it appears
- When the activities list displays, type “set” into the search textbox to narrow the listed activity selections
- Click “Set variable”:

When the “Set variable” activity is added to the pipeline surface,
- Select the “Set variable” activity
- Change the “Set variable” activity’s “Name” property to “Set pipelineIdArray”:
- Click the “Settings” tab
- Click the “Name” property dropdown
- Select “pipelineIdArray”:

The “Value” property displays after the variable name is selected.
- Click inside the “Value” property textbox
- Click the “Add dynamic content [Alt+Shift+D]” link:
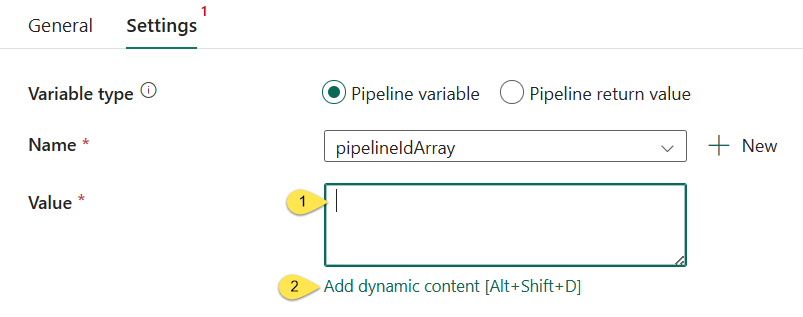
When the “Pipeline expression builder” blade displays, enter the following expression:

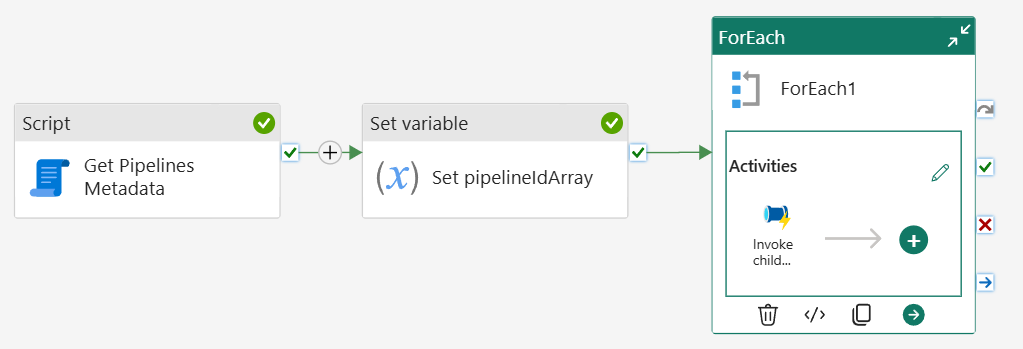
Before proceeding, let’s clean up the messy surface – we have activities all over the place!
Right-click on any unoccupied space of the pipeline surface, and then click “Auto align”:
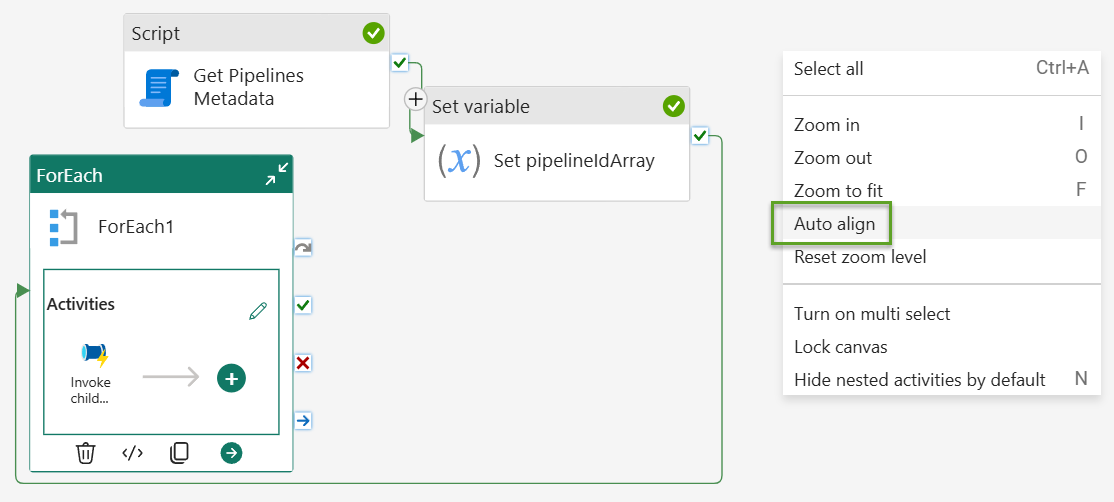
There. That’s better:
Peek at the Array
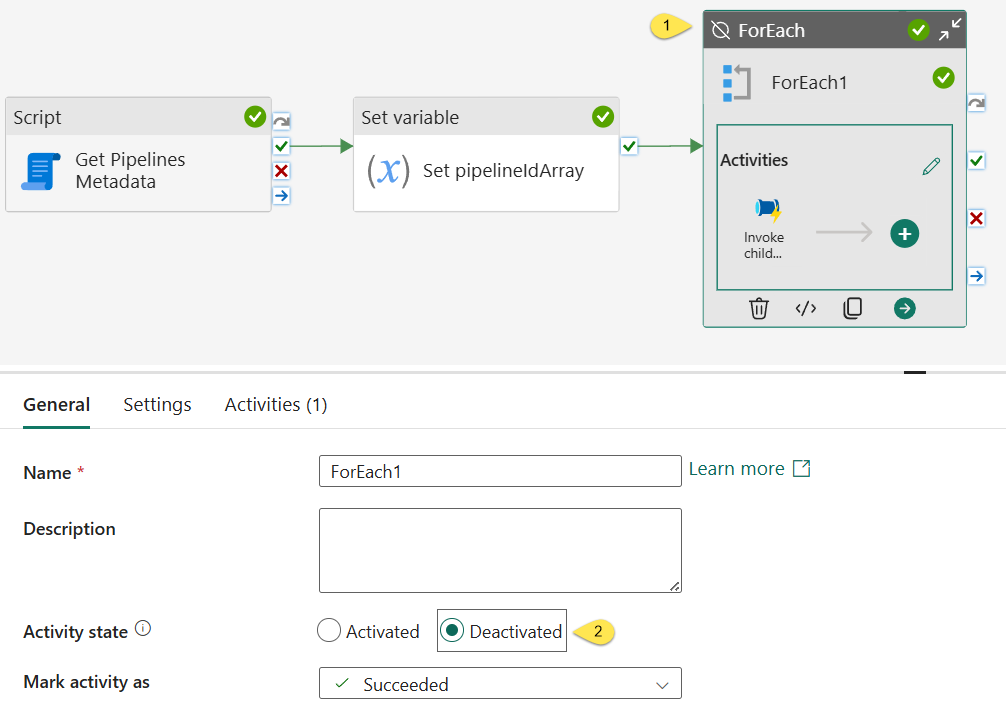
Before proceeding,
- Select the ForEach activity
- Change the “Activity state” property to “Deactivated”:
Execute the pipeline:
In the pipeline “Output” tab,
- Click the “Output” for the “Set pipelineIdArray” (“Set variable”) activity
- Click “Copy to clipboard”:

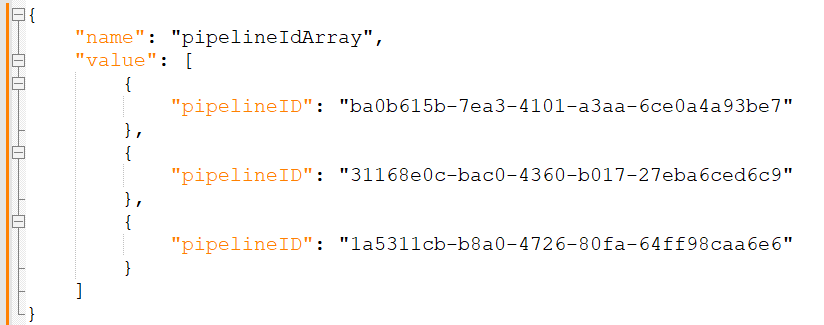
Paste the clipboard contents into your favorite text editor. Here, I paste the clipboard contents into Notepad++ (and set the Language to JSON):
Another JSON Aside
As previously stated, JSON is made up of keys and values, listed in JSON as
In the JSON listed in the image above, the key is “name” and the value is “value”.
The value contains an collection of JSON keys and values.
JSON collections are denoted using square brackets.
The opening square bracket – “[” – that follows “value”: contains more JSON key-value pairs that represent an array (of pipelineId’s) stored in the “pipelineIdArray” variable.
This shows me the JSON value returned from the expression
The “Set pipelineIdArray” (“Set variable”) activity is configured to push a value into the pipelineIdArray variable.
The JSON shown in the image above represents an array of values – of pipelineID values returned from the “Get Pipelines Metadata” script activity – that we are passing into the pipelineIdArray variable.
Activate the ForEach activity before proceeding.
Finally, Edit the ForEach Iterator
In the image above, the ForEach activity named “ForEach1” is selected. Inside the “ForEach1” “Activities” block, click the “Invoke child pipeline” activity to select it:
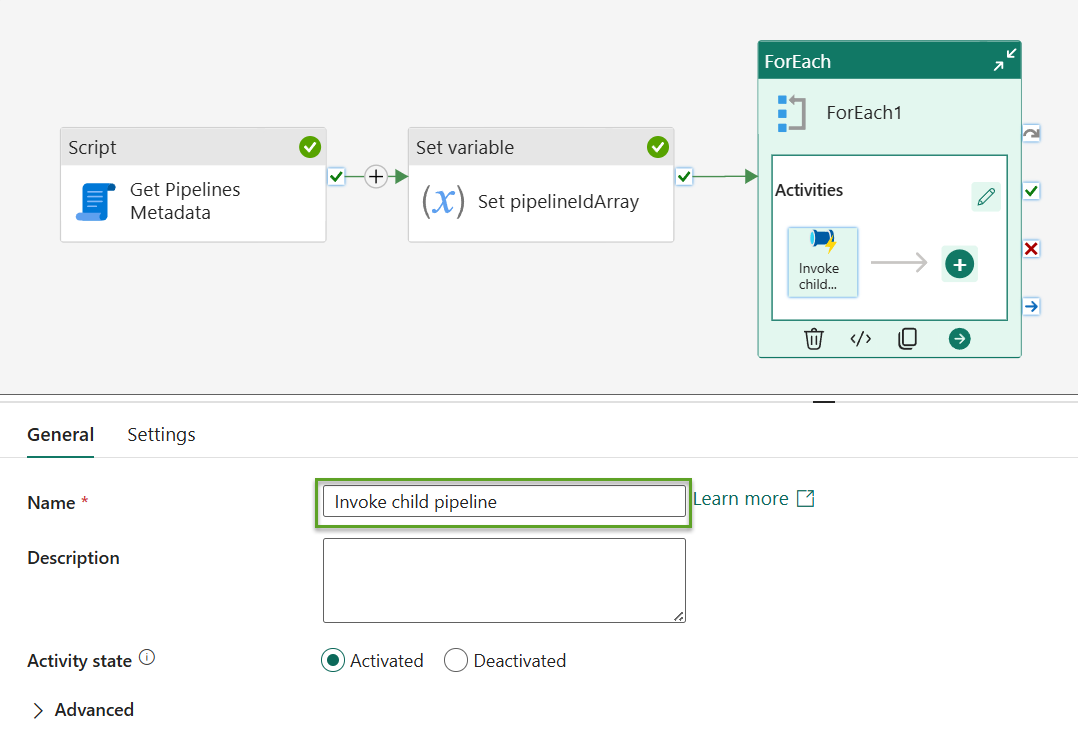
Note the “Name” property shown in the image above indicates the “Invoke child pipeline” activity is selected.
- Click the “Settings” tab
- Click the “Pipeline ID” property value:
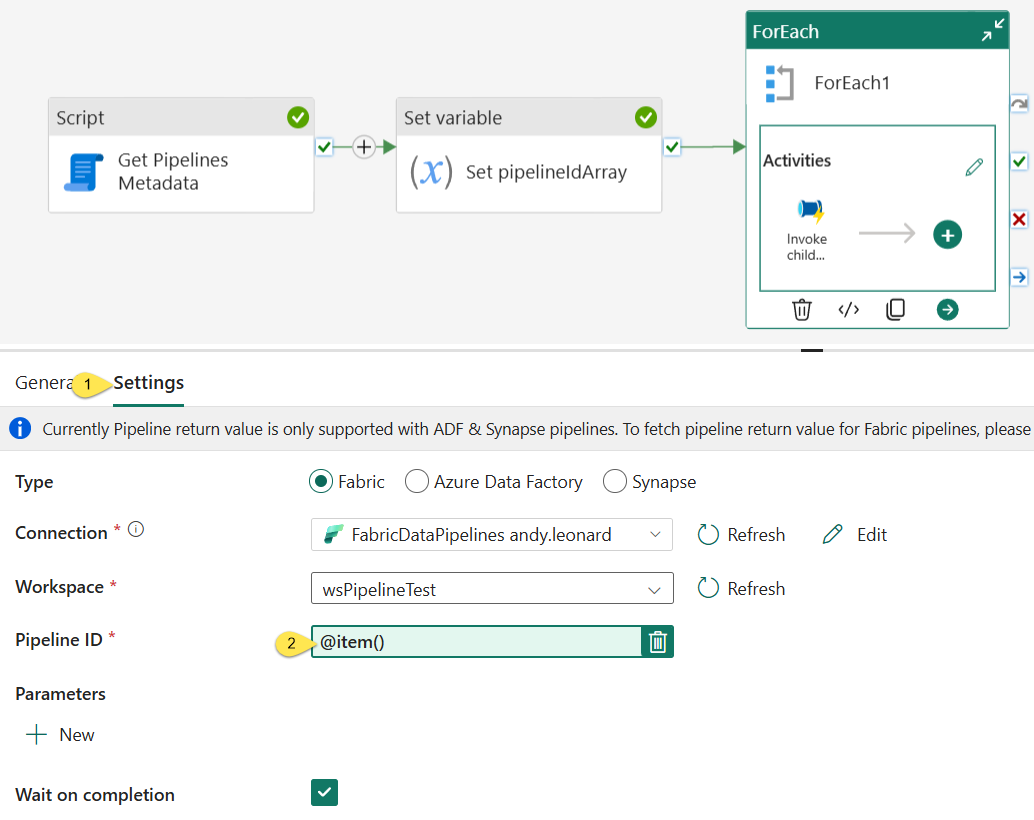
When the “Add dynamic content” blade displays,
- Edit the expression by appending “.pipelineID” to “@item()” so the expression reads @item().pipelineID
- Click the “OK” button to complete editing the expression:

The “Pipeline ID” property dynamic expression now reflects the edited value:
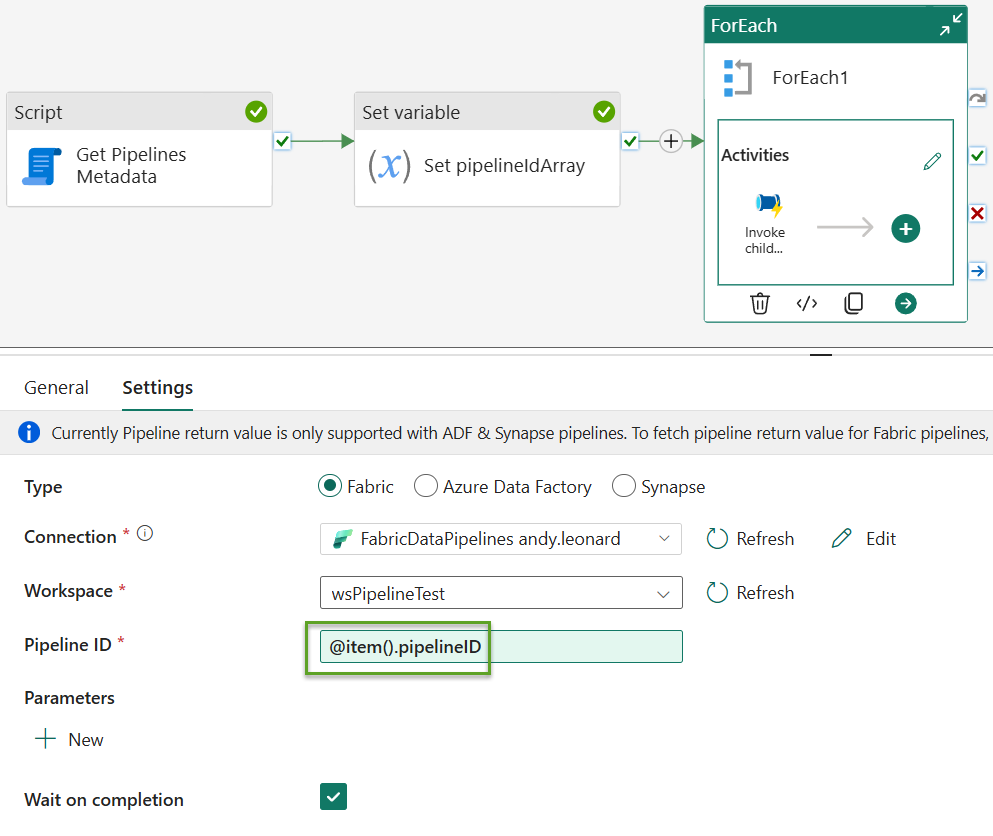
Let’s Test It!
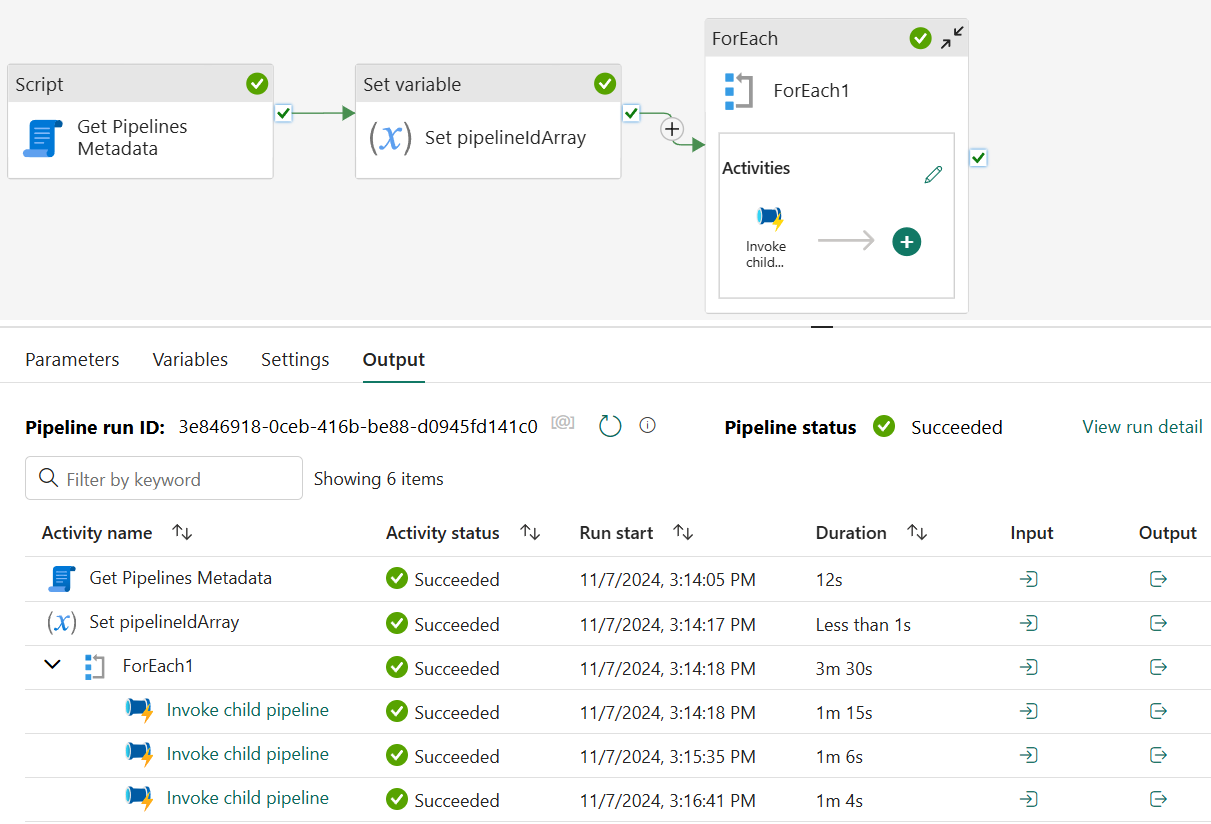
Click the “Run” button to test-execute the pipeline:
Green circles that contain white checks always warm my heart!
Check the Results
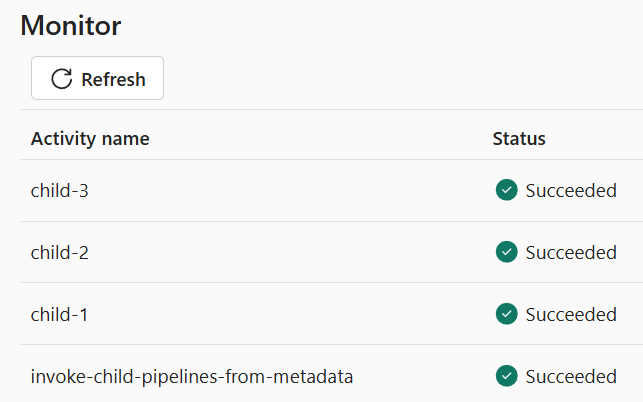
Click the “Monitor” page on the left menu:

By default, the Monitor page lists pipeline executions in latest-execution-first order.
Here, we see the “invoke-child-pipelines-from-metadata” (parent) pipeline executed first, followed by “child-1”, “child-2”, and “child-3”:
Conclusion
There are many ways to design metadata-driven execution orchestration frameworks in Fabric Data Factory. My intent in this post – and in this series – is to demonstrate one approach. I hope my ideas inspire your ideas.
As always, I welcome your feedback.
Need Help?
Consulting & Services
Enterprise Data & Analytics delivers data engineering consulting, Data Architecture Strategy Reviews, and Data Engineering Code Reviews!. Let our experienced teams lead your enterprise data integration implementation. EDNA data engineers possess experience in Azure Data Factory, Fabric Data Factory, Snowflake, and SSIS. Contact us today!
Training
We deliver Fabric Data Factory training live and online. Subscribe to Premium Level to access all my recorded training – which includes recordings of previous Fabric Data Factory trainings – for a full year.
:{>


Comments